5 Best Monopods for Bird Photography in 2026
The best monopod for bird photography is light, stable, and quick to move. It helps support long telephoto lenses during long shoots.
Carbon fiber models are usually lighter, while aluminum models cost less. A smooth locking system makes height changes faster in the field.
For 2026, top picks differ by weight, strength, and portability.
| Acuvar 62 Inch Lightweight Aluminum Camera Monopod |
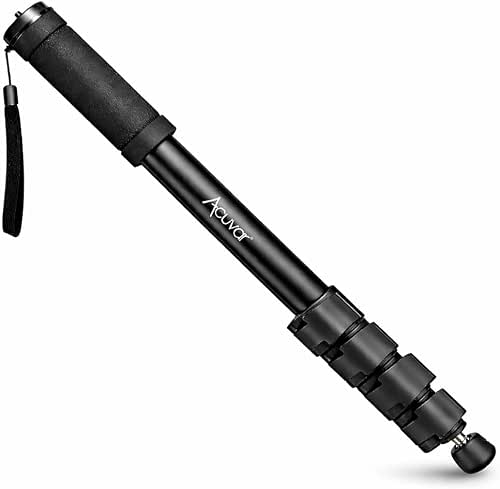
| Lightweight Traveler | Max height: 62 in | Weight limit: Not specified | Material: Aluminum | VIEW LATEST PRICE | Read Our Analysis |
| NEEWER Basics 72″ Travel Tripod Monopod with Ball Head |

| Best Value | Max height: 72 in | Weight limit: 13.2 lb | Material: Not specified | VIEW LATEST PRICE | Read Our Analysis |
| NEEWER Basics Camera Tripod Monopod (TP08) |

| All-in-One Pick | Max height: 77 in | Weight limit: 13 lb / 6 kg | Material: Aluminum alloy | VIEW LATEST PRICE | Read Our Analysis |
| Manfrotto Element MII 5-Section Aluminium Travel Camera Monopod |

| Premium Travel | Max height: 159 cm | Weight limit: 15 kg / 33.1 lb | Material: Aluminium | VIEW LATEST PRICE | Read Our Analysis |
| Avella Carbon Fiber Video Monopod Kit with Fluid Head |

| Pro Video Pick | Max height: 71.25 in | Weight limit: 13.2 lb | Material: Carbon fiber | VIEW LATEST PRICE | Read Our Analysis |
More Details on Our Top Picks
Acuvar 62 Inch Lightweight Aluminum Camera Monopod
During travel with light gear, the Acuvar 62-inch monopod suits bird photography well. You can extend its compact four-section aluminum frame to full height, then collapse it quickly for transport. Its standard 1/4-inch mount fits most DSLR, mirrorless, and video cameras, though you’ll need your own head. You’ll appreciate the padded grip and wrist strap throughout long waits for a perfect shot. Use the rubber foot indoors, or switch to the retractable metal spike for better outdoor traction. This lightweight, stable monopod helps you track birds without hauling bulky support gear.
- Max height:62 in
- Weight limit:Not specified
- Material:Aluminum
- Section count:4-section
- Portability:Compact
- Compatibility:DSLR/mirrorless/video cameras
- Additional Feature:Safety wrist strap
- Additional Feature:Rubber foot
- Additional Feature:Retractable metal spike
NEEWER Basics 72″ Travel Tripod Monopod with Ball Head
NEEWER’s BASICS 72″ travel tripod-monopod gives bird photographers a lightweight, value-packed setup. You can fold it down to 17 inches, carry its 2.9-pound frame easily, and switch it into monopod mode whenever you need faster tracking. The 22.8-to-52-inch height range, 72-inch center column, and invertible column help with reach and macro work. Three leg-angle settings, non-slip feet, and a hook add stability. The 360° ball head, Arca plate, and 13.2-pound capacity support cameras and smartphones alike, including phone holders.
- Max height:72 in
- Weight limit:13.2 lb
- Material:Not specified
- Section count:2-section center column
- Portability:Travel
- Compatibility:DSLR/mirrorless/camcorders/phones
- Additional Feature:Converts to monopod
- Additional Feature:360° ball head
- Additional Feature:Phone holder included
NEEWER Basics Camera Tripod Monopod (TP08)
For bird photographers wanting an all-in-one pick, the NEEWER Basics TP08 switches from tripod to monopod fast. You get an aluminum alloy 2-in-1 support with a 360° ball head, 90° tilt, and an integrated handle for smooth framing. The reversible legs fold down to a compact 4.5-inch package, while the elevatable, invertible center column helps you shoot low or high. It holds up to 13 lb, reaches 77 inches, and includes an Arca-type quick-release plate, non-slip feet, and a weight hook for steadier field use.
- Max height:77 in
- Weight limit:13 lb / 6 kg
- Material:Aluminum alloy
- Section count:Multi-section
- Portability:Compact fold
- Compatibility:DSLR/camcorders/iPhone
- Additional Feature:Invertible center column
- Additional Feature:Integrated handle
- Additional Feature:Weight hook
Manfrotto Element MII 5-Section Aluminium Travel Camera Monopod
Manfrotto’s premium travel monopod suits bird photographers who need strong support without the bulk. You get a 5-section aluminium build that weighs just 0.5 kg, folds to 43 cm, and reaches 159 cm whenever you require extra height. The ergonomic twist-locks let you adjust quickly, while the reversible 1/4″ and 3/8″ screw lets you mount a camera or head. It supports up to 15 kg, so your DSLR or mirrorless rig feels secure. Add the rubber grip, wrist strap, and black finish, and you’ve got a compact travel companion with a 2-year warranty.
- Max height:159 cm
- Weight limit:15 kg / 33.1 lb
- Material:Aluminium
- Section count:5-section
- Portability:Travel
- Compatibility:Cameras/smartphones
- Additional Feature:Twist-lock leg sections
- Additional Feature:Reversible screw mount
- Additional Feature:Rubber grip
Avella Carbon Fiber Video Monopod Kit with Fluid Head
The Avella CD324 Carbon Fiber Video Monopod Kit is a pro video pick for bird photographers who want smooth tracking. You get a fluid head, removable pan bar, and removable feet for controlled movement. Its carbon fiber, four-section legs use flip locks, and it supports up to 13.2 lb. At 27.55 inches folded, it packs easily; extended, it reaches 71.25 inches. The head pans 360° and tilts from -50° to +90°. Use the collapsible three-foot base for steadier framing, but don’t leave it unattended. A six-year warranty adds confidence.
- Max height:71.25 in
- Weight limit:13.2 lb
- Material:Carbon fiber
- Section count:4-section
- Portability:Foldable
- Compatibility:Canon/Nikon/Sony/Olympus/Panasonic DSLR cameras
- Additional Feature:Fluid head included
- Additional Feature:Collapsible three-foot base
- Additional Feature:Removable pan bar
Factors to Consider When Choosing a Monopod For Bird Photography
When you choose a monopod for bird photography, you’ll want to balance weight and portability with enough height adjustment for different shooting angles. You should also check how well it stays stable on rough terrain, whether it fits your camera and lens setup, and should its foot design gives you reliable grip.
Weight And Portability
Carrying a monopod through long birding sessions means every gram matters, so aim for a model under about 1 kg in case you hike far and want to avoid extra fatigue. Even an extra 0.5 kg can wear you down over hours in the field. You’ll also want a folded length around 45 cm or less, since a compact setup slips into a backpack and comes up fast during a bird appears. Carbon fiber helps you keep weight low without giving up too much stiffness, which cuts shake with long lenses. More sections can improve packability, but they might slow setup and reduce rigidity a bit. Don’t forget the head or clamp; fluid heads, ball heads, and adapters can add 200 to 800 g, changing the total load you carry.
Height Adjustment Range
Once you’ve narrowed weight and portability, check how far the monopod extends and how low it can go. You’ll want a maximum height that lets you frame birds at eye level or a bit above, usually around 60–160 cm, depending on your stance and lens. Also confirm the folded length suits your pack; a collapsed size near 40–70 cm makes travel to birding spots easier. Choose a model with a broad adjustment range, such as multiple sections or a center column, so you can quickly set height for perching, ground-level, or seated shots. Don’t overlook minimum height and low-angle use. Fast twist or flip locks matter too, since they should hold your chosen height securely without slipping whenever you’re shooting in the field.
Stability On Terrain
On uneven trails and muddy riverbanks, a monopod’s footing matters as much as its weight. You’ll get better grip provided you choose a model with a retractable metal spike or interchangeable feet: use a rubber foot on hard ground and a spike on soft or icy terrain. On rough slopes, a wider base or fold-out feet add lateral stability and cut sway while you track birds. A low center of gravity helps too, especially as the load sits close to the top. Stiffer carbon fiber or high-grade aluminum, plus secure section locks, reduces flex on rocky ground. Keep a wrist or shoulder strap handy, and whenever possible, brace the foot against a rock or root to stop slipping during long sessions.
Camera And Lens Compatibility
After you’ve sorted out stable footing, make sure the monopod also matches your camera and lens setup. Check the top mount or head for the right thread size, whether that’s 1/4″ or 3/8″, and confirm it works with any quick-release plate or Arca-style clamp you use. Don’t ignore load rating: choose a monopod rated for at least 1.5–2× the weight of your camera body plus your heaviest telephoto lens. Make certain the height range fits your eye level whenever you’re tracking birds and still folds short enough for travel. In case you plan to use a ball head, gimbal, or fluid head, verify its base thread and stability. Also make certain lens collars or foot plates clamp securely without blocking rotation or balance adjustments.
Foot Design For Grip
For reliable grip in the field, choose a monopod foot that matches the ground you’ll actually be standing on. Should you bird in mud, wet grass, or icy edges, pick a retractable metal spike or screw-in carbide tip for secure traction. For blinds, hides, decks, or other hard surfaces, a rubber or non-slip foam foot helps you stay steady without scratching floors or slipping. In case you move between both settings, choose interchangeable or dual feet so you can switch quickly without tools. Wider, tripod-style collapsible bases add lateral stability for long waits and heavy telephoto lenses, easing strain on yourself. Also check for corrosion-resistant materials and secure twist-lock or threaded mounts, especially when you often face salt, rain, or sand.
Grip Comfort And Control
Once your monopod foot is set for the ground you’re working on, the grip becomes the next big comfort and control point. You’ll want an ergonomic padded grip or rubberized handle that eases hand fatigue during long stakeouts and steady bird tracking. A wrist strap or safety lanyard adds security, helping you keep the monopod attached during fast moves or with heavy telephoto lenses. Match the grip material to your climate: rubber or neoprene feels warmer and stays non-slip in wet or cold conditions. Also check the diameter and texture so the handle fits your hand without forcing you to overgrip, which can add shake. In case you switch between handheld and supported shooting, choose a grip that lets you reposition quickly and hold steady.
Locking Mechanism Security
A secure locking mechanism keeps your monopod stable as soon as a bird suddenly shifts position, so choose twist-locks or flip/lever locks rated to hold at least your camera and telephoto lens with a 1.5–2× safety margin. Check for metal or reinforced composite clamps and anodized collars; they resist wear and keep clamping force consistent better than cheap plastic parts. You’ll want locks that let you make small height changes and re-engage firmly without creeping, because even tiny shifts can throw off focus tracking. Look for clear clicks or solid stops, plus torque-adjustment collars so you can tune grip for heavier gear or gloved hands. Make sure the top screw or plate uses a secure 1/4″ or 3/8″ interface with a safety notch or strap.
Quick Setup And Packability
Beyond a secure lock, you also want a monopod that’s quick to set up and easy to carry, because bird action doesn’t pause while you wrestle with gear. Pick one that folds to a short length, ideally under 18–30 inches, so it slips into your backpack and comes out fast in the field. Carbon fiber or lightweight aluminum keeps fatigue down when you hike, and it helps you swing into position without delay. Twist or flip locks let you extend and adjust height one-handed in seconds. A reversible or removable center column adds flexibility for low, high, or inverted setups without extra hassle. A wrist strap, shoulder strap, or carry bag lets you stow it quickly while you track birds between spots.
Frequently Asked Questions
How Do I Carry a Monopod Safely on Long Birding Hikes?
You carry it safest in a snug side or rear strap, tip down, with locks secured; on one 8 mile hike, my strapped monopod rode like a steady walking staff, not a snagging spear.
Can I Use a Monopod in Sand or Marshy Wetlands?
Yes, you can, but you’ll need a wide foot or rubber or sand spike for stability. Keep your weight centered, trial each step, and avoid sinking in soft muck or loose, shifting sand.
Which Monopods Work Best With Spotting Scopes?
You’ll want a sturdy monopod with a fluid or tilt head, like Manfrotto, Sirui, or Gitzo models. They support spotting scopes smoothly, reduce shake, and let you track birds easily without tiring your arms.
How Do I Clean and Maintain a Monopod After Outdoor Use?
Like rain from a leaf, you should wipe off dirt, sand, and moisture, then dry your monopod fully. You’ll check locks, joints, and feet, tighten anything loose, and store it clean and unextended.
Are Monopods Allowed in Wildlife Refuges and National Parks?
Usually, yes, but you will need to check each refuge or park’s rules. You can carry a monopod where tripods are allowed, though some trails, boardwalks, or sensitive areas might restrict it.